By default, Dahua recorders are set to record on continuous mode (24/7), so there’s no need to do any settings, it will record by itself
If for some reason, the machine is not recording at all then you should check the status of the hard drives
Go to HDD Manager and make sure the “Status” of the drive reads Normal
If it says something else, select it and then click Format
Additionally, if it says “HDD not detected”, check the cabling inside the unit, ensure that the data and power cable are correctly plugged in
Events are not being recorded
Motion Detection allows the user to go into playback and see what time the motion took place
If not set up correctly, the motion may not trigger and you may have no footage of your security camera system
First, check the Schedule Settings
Below is an example of a unit configured to record continuous and motion detection mode at the same time. The green bar stands for continuous recording, the yellow one is for MD (motion detection)
Click the setup button and make sure the settings are done correctly
You can have both selected, or just MD
Selecting the All button (highlighted in the picture) applies the period settings to all days of the week and helps make the process simpler
The record settings in the picture below are set to record the Main Stream when an event occurs
Motion Detection has three separate menus that affect recording: Period, Region, and Record Channel
The period setup menu is just like the schedule setting above and the color denotes the time period that an event will trigger a recording
The picture below is configured to record any event that occurs 24/7, it doesn’t mean it will record 24/7, but the motion detection is enabled for the whole 24-hour period and will store the footage if it gets triggered
The region setup menu is where you would mark specific areas of the footage to be tracked
The record channel setup menu shows a list of channels and in order to function correctly, the current channel must match the record channel in the same way shown below. If it doesn’t match, it may cause all the cameras to record on the camera channel
Double check all power connections, power splitters, cable connectors, and etc to exclude connection issues
Switch ports to make sure the DVR/NVR port is providing power to the cameras
Connect the IP cameras directly to the NVR (if there is any) instead of via a PoE switch because the PoE switch could potentially not supply insufficient power to the IP cameras
Check WiFi signal strength
Check the wiring to make sure all wires are firmly connected and without any degradation or impairment
Examine all cables, especially cables through crawl spaces or attics, to see if the cable is chewed, bent, cut, or damaged
This error message is an indication that the IP address of the camera you have added to your NVR have changed
This issue commonly happens if you have some cameras on a PoE switch or connected somewhere other than your NVR
If you are connecting your cameras to a PoE switch and you have a power outage or network issue this may result in your camera(s) IP address changing
Fix this error message by configuring the IP address of your camera to a static IP
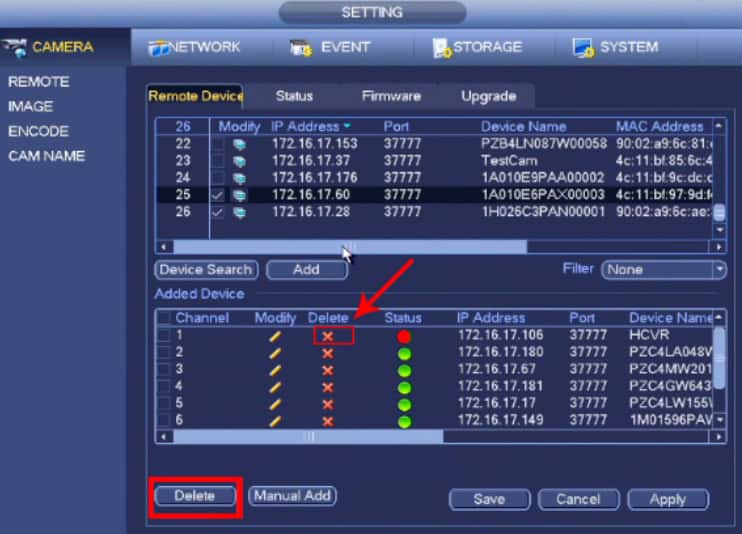
Remove the camera’s IP address (that no longer works) from the Device List on your NVR
Go to the Main Menu
Tap Camera
Tap Remove Device
Tap X under the Delete column on the camera that shows the No Network Host Error
Set the camera on the static IP
Run the Configtool and find out what’s the IP of the camera (or you can find it via the NVR>Remote Device and click Device Search)
Once you know the IP of the camera, access it through the web browser
Once you have logged into your web IU, navigate to the TCP/IP menu of your device by going to Setup > Network > TCP/IP
In this menu, you will notice a field labeled Mode
In the Mode field, click on the Static radio button to change the IP address of your device from DHCP to static
Set a unique IP address that matches your network and the NVR’s IP address using the right Gateway and Subnet Mask
Once this is complete, press Save to save your settings
Go back to the NVR’s Remote Device section
Search for the Devices and add the IP camera to the Device List
Wait 2 minutes and the status icon will become green
After this you’re done, next time the PoE switch goes offline or the camera reboots, the IP address of the IP camera will remain the same and the NVR will be able to access it